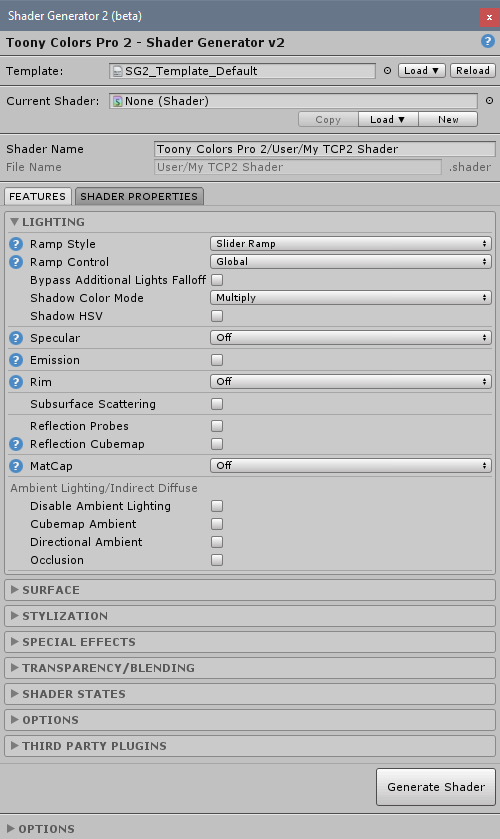
Load a shader template here, e.g. BIRP, URP, ...
This is the current shader being edited, or 'None' if it's a new one.
You can click on this property to highlight the file in the Project view.
This is the name of the shader as it will appear in Unity's shader menu, in the material inspector.
In the **Features** tab, you can select the features that you want to add for your shader, along with their options.
In the **Shader Properties** tab, you can view most of the properties that will be used in your shader, and modify how they are fetched/calculated.
The label for the feature; most of the times you can hover with the mouse to reveal a help tooltip about the feature.
The current value of the feature. If different than the default value, its label will be highlighted.
Features are organized in categories for easier navigation.
Global [[options]] for the Shader Generator 2.
First Steps
-----------
First, you might want to load a shader template:
- the *Default* template is a **non-?[PBS]((PBS means 'Physically Based Shading' and describes a lighting model that mimics the real world, where the shader will calculate most of its colors based on the lighting and a few parameters describing the physical aspects of the materials. The goal is to have a material that will always look good with all lighting environments, vs. a model where you have to tweak material parameters for each lighting conditions. The drawback is that you generally have less control over the final colors, should you want more stylistic visuals.))** general purpose template with a lot of features, that works with the *Built-In Render Pipeline*
- the *URP* template is a the equivalent of the *Default* one for the *Universal Render Pipeline (URP)*
Then, change the *Shader Name*: this will be the name you see in the shader selection menu, in the material inspector.
!L[Loading a template and changing the name](images/sg2_main_2.png)
Finally, look at the various features and enable the ones you want for your shader.
Once you're done, click on `Generate Shader` and the file will be created.
You will then be able to use your generated shader by selecting it in a material.
!!! INFO
Once you click on `Generate Shader`, the generated shader will automatically be loaded in the Shader Generator 2.
You can assign it to a material, and then easily test the various features by enabling/disabling them and clicking on `Update Shader` in the Shader Generator: the material will update along with the shader.
This is a good way to preview the different features on your own models.
!!! INFO
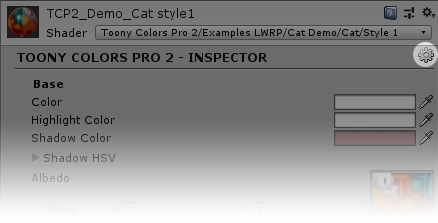
You can easily open a generated shader back in the Shader Generator by clicking on the cog icon in the top-right hand corner of the material inspector:
Once you feel comfortable enough with the *[Features](#featuresreference)* tab, you can look into the [[Shader Properties]] tab for more control.
Options
-------
Option | Description
--------------------------------|--------------------------------------
Select Generated Shader | Once a shader is generated or updated, it will automatically be selected in the Project view.
Always overwrite shaders | Do not prompt when you are about to overwrite an existing shader. _This doesn't apply to shaders that have been modified manually, you will always be prompted before overwriting those!_
Reload Shaders from all Project | By default, the tool will only look for generated shaders in the default output directory (`JMO Assets/Toony Colors Pro/Shaders Generated`). When enabled, this makes it search through all the project assets.
Automatic Filename | Automatically generate the filename for the output shader, based on its UI name.
Automatic sub-directories | Automatically generate sub-directories for the output shader, based on its UI name.
Show disabled fields | Show all fields in the UI, even if they are disabled. Can be useful to see all the options available for each feature.
Show contextual help | Display contextual blue help boxes in the UI.
Dockable Window | Makes the Shader Generator 2 window look like any other Unity window that can be docked anywhere, instead of a separate OS window. You will have to close and open the tool again to see the change.
Templates
=========
A template will be the basis to generate your shader from.
Here is a quick description of each template and what they are made for.
Make sure to also look at the demo scenes to see actual examples.
BIRP
----
The Default template works with the [Built-in Render Pipeline](+https://docs.unity3d.com/Manual/built-in-render-pipeline.html) (BIRP), that works in *Forward Rendering* (Deferred is **not** supported).
URP
----
The URP template is the same as the [[BIRP]] one but working with the [Universal Render Pipeline](+https://unity.com/srp/universal-render-pipeline).
Because the pipelines don't work the same internally, some features might render differently between the Built-in and Universal Render Pipelines.
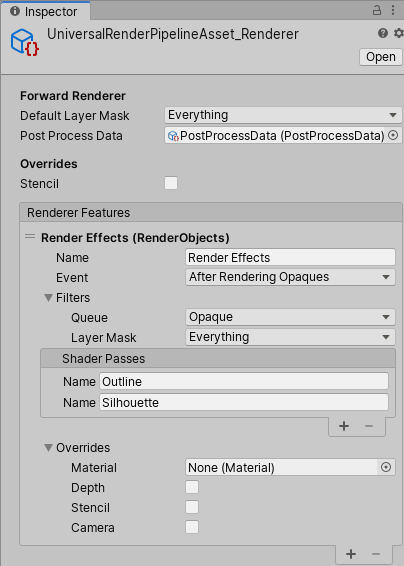
### Outline and Silhouette passes in URP
Additional passes, such as the Outline or Silhouette effects, work differently in URP.
While URP does allow up to one additional pass that can be automatically executed on top of the main pass, this is not the recommended way to do it.
Instead you should manually add a *"Renderer Feature"* in your URP Renderer asset, and use the relevant *"Shader Passes"* (or *"LightMode Tags"* in newer versions) names to enable them ("Outline" and/or "Silhouette" depending on which you need):
!!! WARNING
Make sure that you enable the *URP Renderer Feature* option for both *Outline* and *Silhouette* effects in the Shader Generator 2, so that those passes are effectively disabled in the main rendering loop.
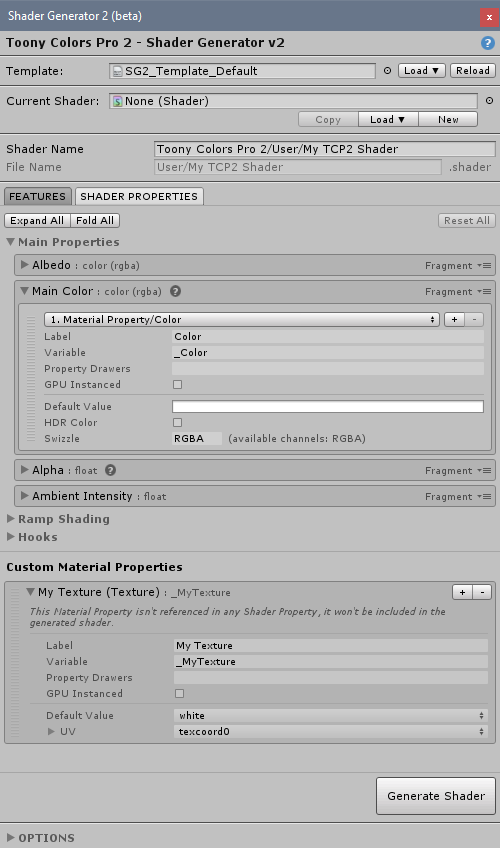
Shader Properties
=================
About
-----
The *Shader Properties* is a powerful and flexible system used to further customize your shaders.
A Shader Property is a property that will be used in the generated shader. They generally correspond to the properties you will see in the material inspector, although that's not always the case.
This interface allows you to change their behavior, change how they are fetched and/or calculated, or do advanced combinations such as applying a mask, and reference properties between each other.
For example, the `Albedo` property is always available: it corresponds to the main texture.
You could change this texture's options to remove the tiling/offset values, or apply UV scrolling to it.
The `Albedo` property is a color, meaning that you can change how it is fetched and use something else than a texture: a single color, the mesh's vertex colors, or even a constant color if you don't plan on changing that value: the shader will be better optimized that way.
Reading the [tutorials](#shaderpropertiestutorials) from the most simple to the most advanced is a good way to progressively understand how the system works.
================================================================================================================================
Structure
---------
A *Shader Property* works with *Implementations*: it has at least one, and can chain more implementations, with an *operator* describing how to combine them:
- Shader Property
- Implementation 1
- Operator 2 - Implementation 2
- Operator 3 - Implementation 3
- ...
In the shader code, the property will generate a variable that will be calculated once at the beginning of its function (`Vertex` or `Fragment`), and then be used in the relevant part(s) of the code.
The code will look like this:
View the available properties by clicking on this tab.
The name of the property, generally describing its usage.
The property type, can be `color`, `color (rgba)`, `float`, `float2`, `float3`, `float4`, or `fixed function`.
Where is the property used in the shader code: `Vertex` or `Fragment` program.
Useful to know which properties you can cross-reference, using the `Other Shader Property` implementation.
This is the current implementation for this property.
See the [[Implementations Reference]] to learn about the different implementations possible.
Use these buttons to add a new implementation, or remove this implementation.
This is one of the parameters of this implementation. It will be highlighted if its value is different than the default one.
Shader Properties are organized in categories, generally themed by the features they are related to.
**Custom Material Properties** allow you to define your own material properties that will show in the inspector, and then use them for any shader properties you want.
The name of the custom property, as it will appear in the material inspector.
The type of the custom property (float/range, vector, color or texture)
The name of the variable of the custom property in the shader code.
This is the name to use if you want to change the value with a script, for example using [`material.SetTexture("_TextureName", myTexture);`](+https://docs.unity3d.com/ScriptReference/Material.SetTexture.html) for a texture.
Use these buttons to add/remove Custom Material Properties.
================================================================================================================================
Interface with multiple implementations
---------------------------------------
You can add as many implementations as you want for each property.
Here is how the interface looks when there are two implementations for a property:
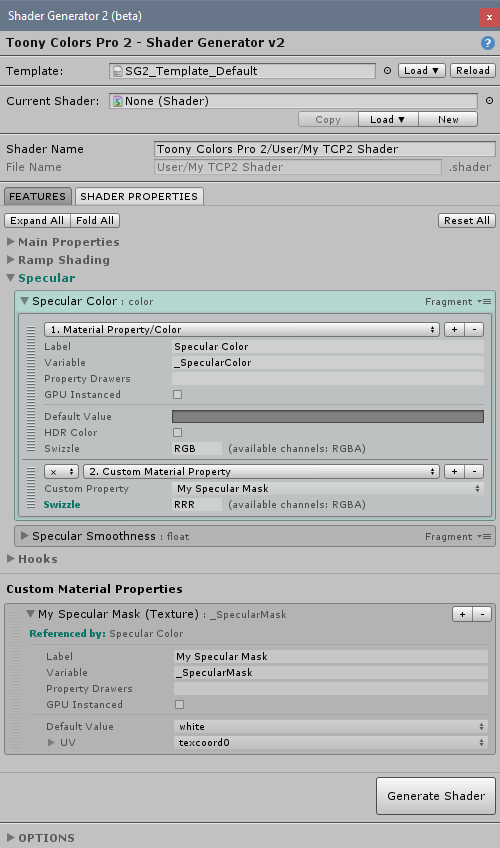
Drag this handle to reorder the different implementations of a property.
How this implementation will be blended with the previous one:
multiply `×`, divide `÷`, add `+` or subtract `-`
Here we have added a `Custom Material Property` implementation, linked to the "My Specular Mask" property that has been added in the **Custom Material Properties** section below.
The swizzle has been modified to only use the red channel: in this case, its effect is that the red channel of "My Specular Mask" will become a mask for the specular color.
This means that specular will appear on red areas, and be invisible on black areas of the texture.
Note that in this case, you could use a [Single Channel texture](+https://docs.unity3d.com/Manual/TextureTypes.html#SingleChannel) with the Red channel to optimize the memory used by the specular mask.
This section will indicate all the Shader Properties that are referencing this Custom Material Property.
================================================================================================================================
Custom Material Properties
--------------------------
Those are material properties that you can define and then easily reference across multiple implementations.
A good example would be a mask texture where each R,G,B,A channels are used to mask different features
================================================================================================================================
Implementations Reference
-------------------------
--------------------------------------------------------------------------------------------------------------------------------
### Constant Value
The simplest implementation: just use a constant value for the property.
Use it when you know that the value doesn't need to change, making the shader faster than if it were a material property for example.
Parameter | Description
-----------|-----------------------
Value | The constant value.
Precision | The [type of variable](+https://docs.unity3d.com/Manual/SL-DataTypesAndPrecision.html) to use.
//#
BLOCK_NAME
Defines a new block, named `BLOCK_NAME`.
:
//#
type
Declares a new variable used by that block.
Type can be `float`, `float2`, `float3`, `float4`
In the Shader Generator, you will be able to write your own value, or use the
*`{n}` notation* to reference other implementations (e.g. a material property)
variable_name
The name of the variable, as used in the code block.
default_value
The default value for this variable, can be any text (e.g. `1.5`, `float3(1,2,3)` or `sin(_Time.y * 4) + 1`)
//# !
Defines a comment that will show in the Shader Generator UI. Can be useful to hint at the output variable name for example.
Comment to show in the UI
float
_output_ = sin(variable_name) * 4;
///
Comments in the code with three `///` will be excluded in the final generated shader.
Comment that is exclusive to the prepend file
// Comment that will be included in the shader
//# NEW_BLOCK:
A new block or the end of the file will define the end of the previous block.
...

Select the **Material Layers** tab to view this interface.
These buttons allow you to **remove** this Material Layer, or to **add** a new one.
This is the internal ID of this Material Layer.
This ID will be replaced by the name for labels and variable names in the final shader.
The name of the layer (note: this affects the property names by default, so be careful if you change it afterwards: you might lose texture references in your materials).
Enable the Noise property: it will affect the layer source to add an extra level of detail.
Enable the Contrast property: it will add a way to adjust the contrast of the layer source easily from the material.
Load a preset for the Layer Source (note: this will entirely replace the Layer Source implementations).
These are the Layer's [[Shader Properties]]: you can modify their implementations like any other Shader Property (here this is the Layer Source).
Material Layers can use [[Custom Material Properties]], so their interface is replicated here.
A typical example would be to use a single texture as a source, where each R,G,B channel is the source for 3 different material layers.
### Shader Properties tab
You can enable layers for any Shader Property, here's an example with the Albedo property:

Select the **Shader Properties** tab to view all the properties, and be able to toggle layers for any of them.
This icon indicates that this property uses at least 1 material layer. Moving the mouse over will show a tooltip telling which layers are used exactly.
This is a convenient way to view which Shader Properties are using Material Layers when they are all folded.
When at least 1 Material Layer has been defined, this small menu will show for each property. Select a Material Layer here to view its options for this property.
This corresponds to the internal ID of the layer, and will be replaced with its name in the final shader (here "Snow"), such that if the layer name is changed afterwards, the variable will automatically reflect the new name.
The blending method of the new property based on the layer.
See [[Layer Blending]] below for more details.
Enable the Material Layer for this Shader Property: this means that this property will be blended between two values, according to the Material Layer source.
Disable this option to be able to edit the implementations of the layer version of the Shader Property.
Here it is disabled and the layer property is now a **Color** instead of a **Texture**: the shader is thus more optimized since a color is much faster to sample than a texture.
See [[Same as Base Layer option]] below for more details.
Tip: no need to change the label here, even though it is the same as the base property, because all properties for a single layer will be regrouped under the same section in the material inspector!
### Same as Base Layer option
When a *Shader Property* uses a *Material Layer*, a *copy* of it will be made, and then the shader code will blend between those two properties according to the layer source.
By default, the copied Shader Property will use the same implementations of the base Shader Property, with only its variable name changing if it's a Material Property.
You can override that behavior by disabling the "*Same as Base layer*" option, and use any other implementations for the copied property.
For example, the base property could be a *Texture*, and the copied one a simple *Color*, as in the example above.
Or both could be textures, but the layered one could use *UV Scrolling*.
### Layer Blending
The Layer Blending defines how the new property will be blended with the original one according to the layer source value.
By default it uses *Linear Interpolation*, which can be thought like alpha blending: the new property value will be blended over the original value based on the layer source value (a source value of 1 means that it will be 100% the new property value, a source value of 0 means that it will be 100% the original value).
In the Snow layer example (see the screenshot below), the original value is the Albedo texture color, the new property value is the Snow color, and the layer source is a value from 0 to 1 indicating whether the mesh normal is pointing upward.
This results in the Albedo texture color being replaced with the Snow color where parts of the mesh are pointing up.
Other blending modes are available to blend the new value differently (additive, multiplicative, etc.).
#### Custom Blending
You can also use a custom blending formula, in the form `a = lerp(a, b, s)`, where each letter corresponds to a variable:
- `a` is the original property value (for example, the Albedo texture)
- `b` is the new property value for that layer (for example, the Snow color)
- `s` is the layer source value, as defined in the Material Layer (in the Snow example, that would be a 0 to 1 value indicating of the normal is pointing upward)
**Note**: The default `lerp(a, b, s)` corresponds to the Linear Interpolation formula; you can change it to whatever you want.
!!! WARNING
It's up to you to verify the validity of the formula, no error checking is done in the editor or when generating the shader.
### A note on normal-based layers with normal maps
When using normal-based layers (e.g. procedural snow based on upward normals), the normal used will be *from the mesh* only, and not the normal map.
In the *Features* tab, *Surface* section, under the [Normal/Bump Map](#featuresreference/surface/normal/bumpmap) feature, you have the *Sample Normal Map first* option.
Enabling it will allow the *Material Layers* to use the normal from the normal map, instead of from the vertices:

Code Injection
==============
About
-----
If you need even more control on the output shader, you can use the *Code Injection* system to add arbitrary code in various places throughout the shader.
It adds extra flexibility in addition to the [[Shader Properties]] system, and can also be used as a replacement if you are comfortable enough with shader code and don't want to deal with the Shader Properties UI.
The system requires you to prepare your own .cginc or .hlslinc file formatted with special comments.
You can open and read the *"TCP2 Code Injection Example.cginc"* file to have an overview of all its features and how to use them.
!!! WARNING
This system is currently experimental!
Please [send me](#contact) any feedback you may have on it: bug report, feature suggestion, usability...
Thanks!
Example
-------
You can find the *"TCP2 Code Injection Example.cginc"* example file in the demo folder:
- Go to the "CODE INJECTION" tab
- Click on "Add Injected File"
- Select "TCP2 Code Injection Example.cginc" as the injected file
- The UI will update with information about auto-injected blocks
- (Optional) Look for the `pulseSpeed` custom Shader Property and expand it: it is a constant by default but you can change it into a Material Property for example, like all [[Shader Properties]]
- Generate a shader: a new injected property will be available in the material that will add a pulsing color to the albedo
The "*TCP2 Code Injection Example.cginc*" file includes comments that describe the whole format of the code injection files.
Please take a look at it to figure out how to inject your own code.
Interface
---------
Move your mouse on the different elements to learn about the interface:

Go to the Code Injection tab here.
Enable this option to add comments identifying each injection point in your .shader file.
Comments will have the format: `// Injection Point : NAME`
Removes that injected file and all injected blocks associated with it.
Select the injection file here, containing the code blocks in the proper format (see the "*TCP2 Code Injection Example.cginc*" file for an example).
Add a new injected block here: a menu will show to first select an injection point among those available in the current template, and then an available block to inject.
It's up to you to handle the compatibility between the injected block and the injection point (e.g. proper variables names if you are reusing existing ones).
This is a "Replace" block that can replace any text in the final shader with something else.
It can't be deleted but can be disabled like other blocks.
This is the name of the injection point for this block.
This is the name of the injected block for this point, as described in the source file.
Remove this injected block.
Reorder the injected blocks here. This is mostly useful if you are injecting multiple different blocks at the same injection point, to ensure they are in the correct order.
Injected blocks that contain custom [[Shader Properties]] will show as a foldout, to reveal their shader property(ies).
A custom `float` Shader Property as described in the source file.
It will be set as a constant by default, but can be changed to another implementation (a `Material Property/Range` for example so that the end user can change its value in the material inspector).
Add another injected file.
You can disable any block here, if you want to use a single Code Injection file for multiple shaders for example
This is the optional information for the "Replace" block defined in the injection file
This is an "Append" block, that works like the "Replace" one without removing the searched content, but adding after it.
"Prepend" works the same, inserting the content before the searched content.
Shader Properties Tutorials
===========================
These tutorials can help you understand the process and possibilities of modifying [[Shader Properties]] to customize your generated shader.
For clarity they are regrouped in an external page: [Shader Generator 2 Tutorials](+tutorials).
Tutorials list:
Quick tips:
- [Add UV Scrolling to a Texture]("tutorials.html#adduvscrollingtoatexture")
- [Use Non-Repeating Tiling]("tutorials.html#usenon-repeatingtiling")
- [Add a Texture mask for any property (e.g. Emission)]("tutorials.html#addatexturemaskforanyproperty(e.g.emission)")
- [Use triplanar mapping on any texture]("tutorials.html#usetriplanarmappingonanytexture")
- [Add Hue/Saturation/Value control to any color]("tutorials.html#addhue/saturation/valuecontroltoanycolor")
Step-by-step:
- [Use Vertex Colors as Albedo]("tutorials.html#usevertexcolorsasalbedo")
- [Add a detail texture (simple)]("tutorials.html#addadetailtexture(simple)")
- [Add a detail texture (advanced)]("tutorials.html#addadetailtexture(advanced)")
- [Create a hologram shader]("tutorials.html#createahologramshader")
- [Create an advanced dissolve shader]("tutorials.html#createanadvanceddissolveshader")
- [Create a custom Terrain shader]("tutorials.html#createacustomterrainshader")
Contact
=======
If you have questions, bug reports or suggestions please contact me by email at: jean.moreno.public+unity@gmail.com
 )) line.
RGB Slider Ramp | Same as slider ramp, but separating the threshold and smoothness values for the red, blue, green channels.
)) line.
RGB Slider Ramp | Same as slider ramp, but separating the threshold and smoothness values for the red, blue, green channels.